
Scenario:
You want to use GSLB.me as the authoritative DNS for your domain “mydomain.com“. mydomain.com can be a new domain you’re about to register, or it can be an already existing domain. Once done, you want to run “www.mydomain.com” from your webserver which sits on an Internet connection with a dynamic IP.
How to configure it:
Log on to GSLB.me using your credentials or register if you still don’t have an account
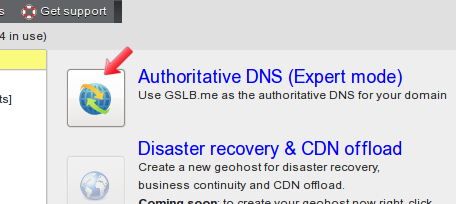
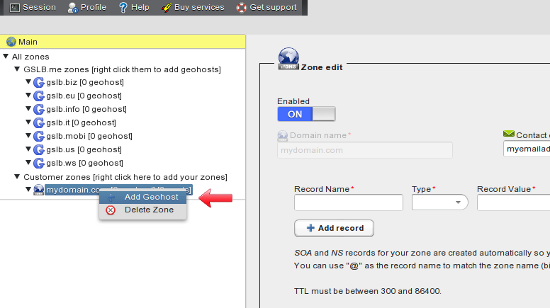
Create a new “customer zone”: this is the domain name you want to handle using GSLB.me as your authoritative DNS. You can create a customer zone for a domain name you already own (in this case you will ask your registrar to modify the authoritative DNS it relies on) or for a domain name you still have to register (in this case you will tell your registrar to use GSLB.me as your domain’s authoritative DNS servers). Creating a new zone can be done either by clicking on the button you can find on the main page immediately after logging on to GSLB.me…
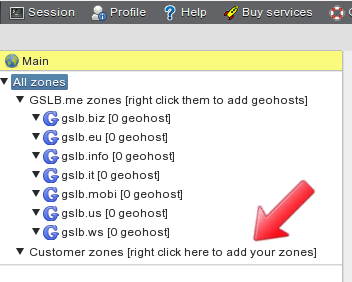
…or by right clicking in the main panel on the “Customer zones” section.
The “Zone edit” page allows you to create your domain: here you have to specify the domain name and the e-mail address of the contact person. This e-mail address will be used as the postmaster in the SOA record for your zone.
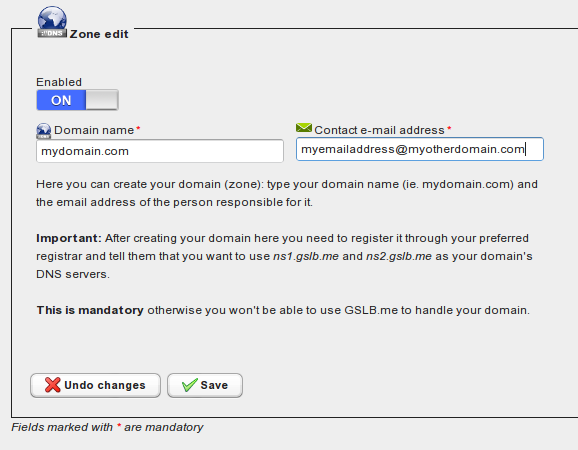
Once done, click on “Save” to create your zone. After saving, the left-hand side of the page will be updated showing your newly created zone:
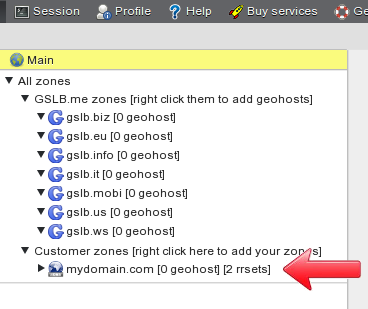
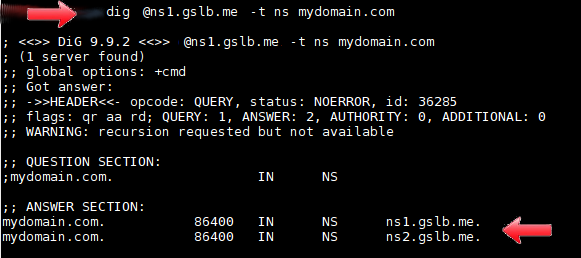
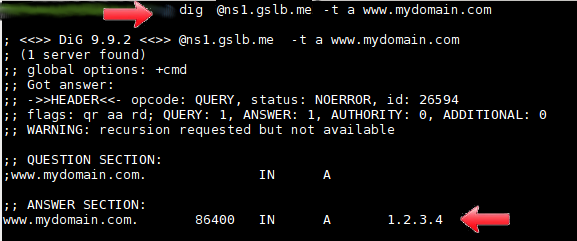
The SOA and NS records for your zone have been automatically created. “2 rrsets” indicates that ns1.gslb.me and ns2.gslb.me have been defined as the “NS” records for your domain. You can check this using dig or similar tools:
On the left-hand side of the screen click on the domain you just created: this brings you to the main domain configuration page.
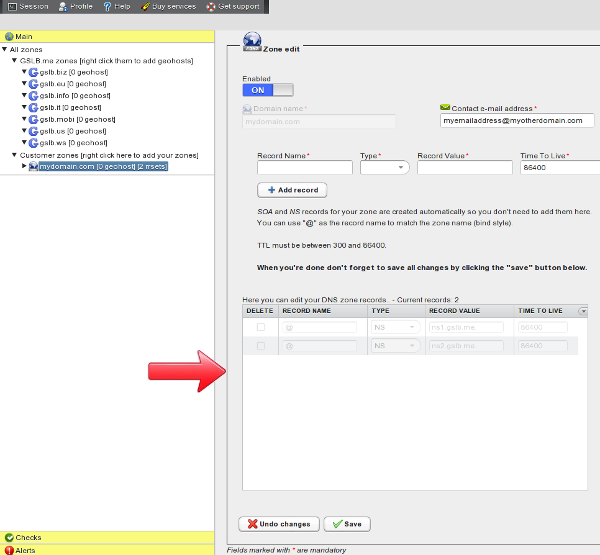
Here you can change the domain’s contact e-mail address and fully edit your domain records (also called rrsets). Record types A, AAAA, ALIAS, CAA, CERT, CNAME, LOC, MX, NS, RP, SOA, SPF, SRV, SSHFP, TXT are supported. In order to add a new record you simply have to type the record name, select the type from the dropdown menu and assign a value. TTL can be set it to any value in the 30-86400 seconds range.
In order to add a record for your zone you have to set the record name, select its type, define the value and set the TTL (free users can’t change TTL: it is set to 86400 seconds by default). When done, click “Add record” in order to save the new rrset.
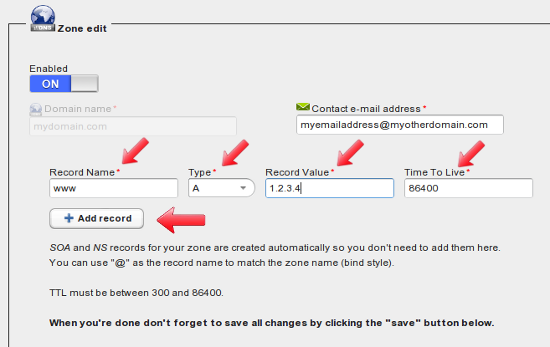
After saving your record(s), it is displayed in the lower section of the page. In the example here the record name “www” is appended with the zone name: the actual record shown here is www.mydomain.com, and it points to IP address 1.2.3.4
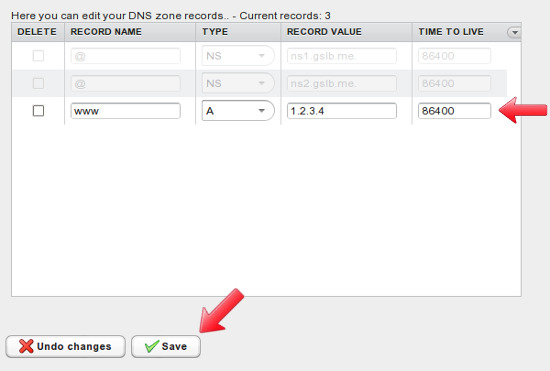
It is required to click on “Save” when all records have been added to your zone. If you don’t do this, your records will be kept but they will not be active. Clicking the “Save” button applies changes and makes all records active and running.
You can now check to see if the newly configured record works fine:
After configuring all the records you need (free users are limited to 20 records, subscribers can use an unrestricted number of records per domain) you need to get back to your registrar and tell them that you want to use ns1.gslb.me and ns2.gslb.me as authoritative DNS for your domain (mydomain.com in this example).
When configuring a record you can use a FQDN (Fully Qualified Domain Name) as the record value: for instance record “@”, type “MX” can have a value of “10 myothermailserver.myotherdomain.com.”. If the record value ends with “.” it is used as it is. If it doesn’t end with “.” your zone name is added at the end of the specified record value. For instance record “@”, type “MX” can have a value of “10 mail”. This means that the Mail eXchanger for mydomain.com is mail.mydomain.com where “.mydomain.com” is added after “mail”.
Once this last step is completed, your www.mydomain.com FQDN correctly responds to DNS queries.
How to update dynamic DNS records:
Dynamic DNS records can be updated in two ways:
- Using GSLB.me REST APIs either directly or through GSLB.me update client
- Using a standard update client such as ddclient: GSLB.me fully supports dyndns2 protocol
Updating dynamic DNS records via REST APIs:
You can install GSLB.me update client in order to tell GSLB.me to associate your dynamic IP address to your FQDN (www.mydomain.com in our example).
GSLB.me update client can be downloaded here (you need at least v1.1beta). It’s a Java client, hence it can be run virtually anywhere. It provides a number of parameters in order to correctly fetch your dynamic IP address. Once downloaded and unpacked you will find the startup script inside the “/sbin” directory. Some useful commandlines to run it are:
Updating a FQDN with the public (dynamic) IP of the specified interface without/with custom TTL:
	./sh.GSLB.ME-RestClient -u [username] -p [password] -dyn [fqdn] -iface [interface name]
	./sh.GSLB.ME-RestClient -u [username] -p [password] -dyn [fqdn] -iface [interface name] -ttl [seconds]
Updating a FQDN with the public (dynamic) IP using automatic IP detection without/with custom TTL:
	./sh.GSLB.ME-RestClient -u [username] -p [password] -dyn [fqdn]
	./sh.GSLB.ME-RestClient -u [username] -p [password] -dyn [fqdn] -ttl [seconds]
For correct operations running the update client should be done via crontab every 2 minutes or so, in order to keep your FQDN in sync with your dynamic IP.
Crontab job example:
*/2 * * * * root /home/mydir/GSLB.ME-RestClient/sbin/sh.GSLB.ME-RestClient -u username@domain.com -p myPassword -dyn www.mydomain.com -ttl 60 >/dev/null 2>/dev/null
Updating dynamic DNS records via dyndns2 protocol:
GSLB.me fully supports the dyndns2 protocol. It is then possible to use any DNS update client or device that can use the dyndns2 protocol to update your dynamic DNS records.
One of such update clients is ddclient (http://ddclient.sourceforge.net/) and a sample configuration you can use to make it work with GSLB.me is:
daemon=30                       # check every 30 seconds
syslog=yes                      # log update msgs to syslog
mail=YOUR_EMAIL_ADDRESS         # mail all msgs to your e-mail address
mail-failure=YOUR_EMAIL_ADDRESS # mail failed update msg to your e-mail address
pid=/var/run/ddclient.pid       # record PID in file.
use=if,if=ppp0                  # set dynamic IP address via interfaces

server=dynupdate.gslb.me        # GSLB.me update server
login=YOUR_GSLBME_USERNAME      # GSLB.me username
password=YOUR_GSLBME_PASSWORD   # GSLB.me password
protocol=dyndns2                # The dyndns2 protocol
YOUR_GSLBME_DYNAMIC_FQDN        # The dynamic DNS record to update (ie. www.mydomain.com)
Conclusion:
In addition to using GSLB.me as your authoritative DNS of choice you can seamlessly mix static DNS resolution together with GSLB dynamic resolution to handle disaster recovery, business continuity, CDN offload, geographical balancing for one or more records in your domain (such “smart” records are referred to as “geohosts”). To achieve this, simply right click on your domain name and create your geohosts!
In order to discover the full power of geohosts you can read our other howtos.